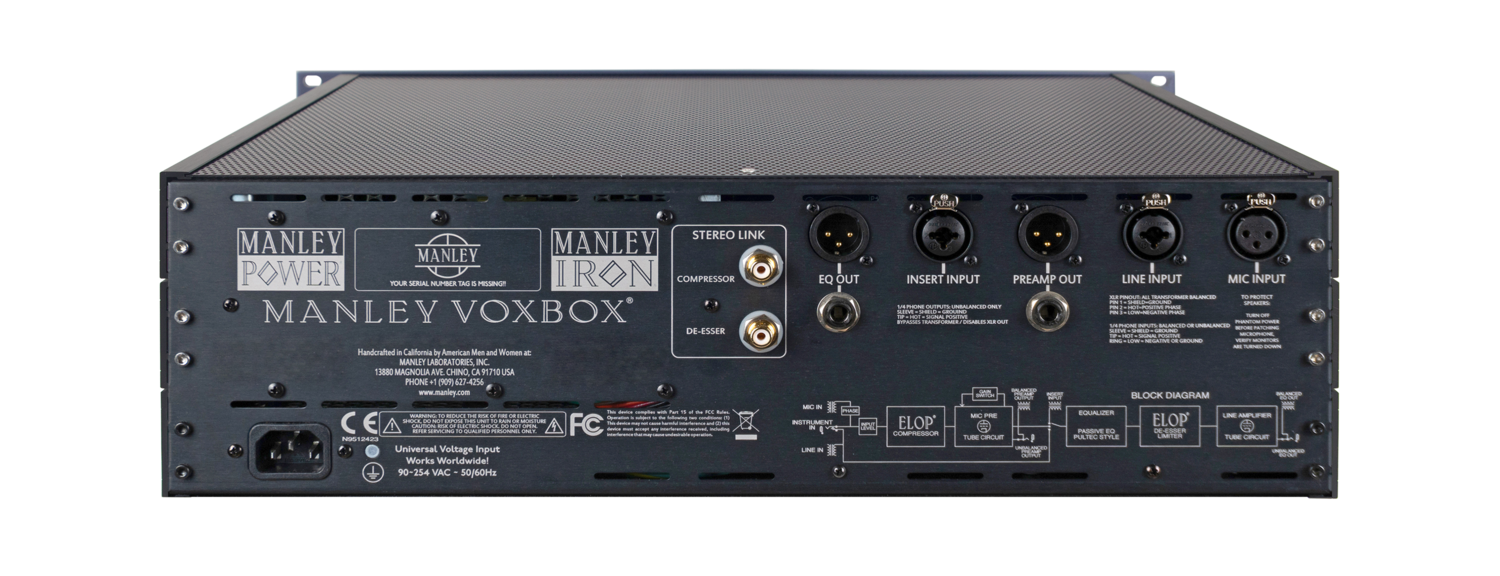
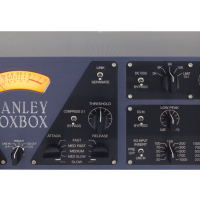
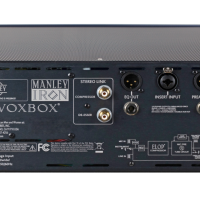
0
Product is toegevoegd aan uw winkelwagen

Manley VOXBOX

Hi end buizen channel strip van Manley.

Prijs op
aanvraag

Voeg dit product toe aan uw offerte

In offerte

Vragen? Betere prijs gezien?

Bel 0512 - 340457 of neem contact op!

Product omschrijving

The VOXBOX® combines the legendary Manley Mono Mic Preamp, the ELOP reborn as a lower ratio compressor, the MID EQ blown out as a full range PEAK-DIP-PEAK EQ, and a DeEsser with a second ELOP limiter at the end. Using the Direct Input, bass players often wonder why it wasn’t named the BASSBOX.

IT LOOKS AWESOME, BUT WHAT IS IT?

Primarily, it is a voice processor which in itself is not a novel idea, but the time had come to pull out all the stops and make a truly professional high-end statement. One that covered the needs of the project songwriters and big-time major studios alike. One whose all-tube signal path could bring every instrument and overdub to life. One that, plain and simple, sounded unquestionably better than the rest, provided flexibility, simplicity, and well thought-out ergonomics. Full of features, timeless style, robust build quality, and that world-famous "Manley Sound", we present to you the MANLEY VOXBOX®.

THAT'S NICE. WHAT'S IT GOOD FOR?

While we were designing the VOXBOX® we couldn't help but notice how well it works on other instruments besides voice. There are some great settings for drums, bass, guitar, and keys and the two separate sections can be used together or independently. Stereo using two VOXBOXes? You know we couldn't resist planning for that as well. There are Stereo Links for both the compressor and the De-Ess/Limiter sections, special compression settings and super-sweet EQ frequencies for your mix or pre-mastering. So don't just use it for voice. The name "VOXBOX®" represents only the beginning...

"A big question on forums is, "Is it better to have a tube mic or tube mic pre to add warmth to your signal?" If the mic pre is the Voxbox, I can confidently say it would be no contest for me...It gives you a clear sound, and with the variable gain control, you can control how much smoothness you want."

- Glenn Bucci, Pro Studio Reviews, November 2007 -


BLOCK DIAGRAM / SIGNAL FLOW


MICROPHONE PREAMPLIFIER SECTION:

The preamplifier is a clone of a highly regarded and popular mic pre: the Manley Mono Microphone Preamplifier! The mic input transformer is our own design wound in-house at the Manley Labs factory. High current 48V Phantom power is switchable from the front panel. A simple and effective passive BASS CUT switch kills rumble and reduces popping. The INPUT ATTENUATOR is a variable pad control situated before the first tube stage allowing the preamplifier to accommodate +4 line level signals via the balanced LINE INPUT and instruments via the front panel 1/4" DIRECT INPUT. These inputs are selected in the middle position of the dual-function phase invert switch. We provide both transformer balanced XLR output as well as a transformerless "audiophile" 1/4" phone jack output. The Gain switch is actually a clever variable feedback control that changes not only the gain but the slew rate and flavor of the circuit. With it you can choose how laid back and mellow or how up-front and aggressive you want it to get. See "Notes on Variable Feedback" for more info. Headroom is a strong point in this circuit, +31dBu capable. This is 5 to 10 dB better than almost all other pro gear. The music passes through only our super-clean pure Class A vacuum tube circuitry. There are obvious advantages to our purist approach and foremost is the un-electronic final sound that carries emotion into the digital realm.

COMPRESSOR SECTION:

This cool compressor design takes our opto-isolator approach of the Manley ELOP® Limiter to the max. We adjusted the Ratio down to 3:1 to turn our ELOP into a compressor and added ATTACK and RELEASE controls for more versatility. What is clever is how the signal is compressed before it hits the tubes with no detrimental effect on distortion or frequency response. This way, it can prevent mic-pre clipping and eliminate whole stages of electronics. This cuts the typical path of mic to tape in half! We also pioneered new thinking in the sidechain by using up to four different time constants simultaneously and controlling them with familiar simple attack, release and threshold controls. We call the approach "Parametric Compression". We developed optimum settings or presets based our favorite Vactrols that we use in our own fast ELOP® Limiter, the quick LA-2A's T-4 module, the slower LA-3A and then created more complex special settings. This extended range and method of timing delivers fresh sounds from powerhouse punching drums to super-solid bass yet can also emulate the way good engineers delicately ride a fader while recording. It is transparent and liquid-smooth on vocals, easy to use and accurate. Also rare for an opto-based dynamic processor, this compressor works great on mixes. Of course, you'll be needing two VOXBOXes linked in stereo...

EQ SECTION:

Lots of folks requested that we include the Pultec Mid Frequency Equalizer in the VOXBOX®, but they wanted MORE.... Now we've extended it to 33 frequencies in 3 bands with 6 new frequencies from 20 Hz to 150 Hz, and 6 more in the highs from 6.4 KHz to 20 KHz. Ever notice that only EQs with real inductors have the bottom end magic or that only Class A circuitry can keep the top end sweet? This is for you. The EQ INPUT switch patches in the Line Input, Preamp Output, or the INSERT return. This switch serves double-duty acting as a bypass switch for the preamp and/or external processors or for processing two different tracks.

DE-ESSER & LIMITER SECTION:

Designed by folks with admittedly large gaps between their two front teeth, the VOXBOX® combo also includes a de-esser & peak limiter based on our original ELOP® Limiter design but with an added passive LC network to handle the de-essing four carefully chosen notch frequencies from 3KHz to 12KHz. (That 3KHz setting really tames those annoying frequencies!) The fifth position gives you a limiter which totally mimics the famous LA-2A. This means you can both compress pre-EQ then limit here post-EQ. Another cool feature is the ability to insert this de-esser silently and smoothly as the music plays, using it as needed.

THE METER:

The METER is a full size illuminated Sifam VU meter. A five-position switch shows three audio levels: the line input, the preamp output and the final output. It also shows compressor gain reduction and the de-esser/limiter action. Other clever innovations incorporated into the VOXBOX® combo include warm-up muting circuitry, extensive magnetic field containment, 'smart -grounding', and silent switching. The sum-total is more than the separate parts: consider the reduced patching, the short path to tape and you having this much immediate control. As engineers, we choose what we use not based entirely on features and functions - there is a sound, a texture we reach for and the VOXBOX® combo puts the 'Manley Sound' together with 'Your Sound'.

OPERATING MAINS VOLTAGE:

Units are purpose built for original destination country's mains voltage: 100V, 120V, or 220-240VAC as indicated on the serial number badge. Power transformer must be replaced in order to change mains operating voltage.

120VAC units may NOT be rewired to put the primaries of the power transformer in series for 220-240V operation or a large radiated field of hum will develop. If changing locations/voltages, the power transformer must be replaced with the dedicated one for the voltage at which it will operate and the mains fuse must be changed.

Mains Fuse Value for 120VAC = 1 Amp Slo-Blo 1/4” x 1 1/4”
Mains Fuse Value for 240VAC= 1/2 Amp Slo-Blo 1/4” x 1 1/4”


FREQUENTLY ASKED QUESTIONS

1. Why do I hear some hiss at the higher GAIN settings? 

The input control is an ATTENUATOR, not a volume control. It is used to knock down the level of a hot signal, not boost the level of a weak one. The default position on this control is FULL CLOCKWISE. Turning this control up does not raise the noise level, but stepping up the gain DOES. The lowest noise performance is going to be with the INPUT control fully CW (Clockwise), and with the GAIN switch set at the lowest setting (40db). When set to the 60db gain setting, you might hear some hiss. 

2. What's the "High Gain Mod"?

The High Gain Mod for Serial Numbers MVB000 - MVB737 includes tube changes, resistor changes, re-cal and checkover plus return shipping (within USA). This mod updates older Voxboxes to current version (MVBX###) for more gain: 40, 45, 50, 55, 60dB. Please contact our service department with questions.

3. I have a VoxBox® which I use as my main input into my PT system, recording not only vocals through it but most anything else too. To achieve a stronger level from guitars you suggest running it through an effects pedal before the VoxBox®. Would running it through a Di first be better? And if so, would you recommend active or passive or indeed your Dual Mono Di?

My comments were meant to address the low-ish gain of the VoxBox Direct Input and the possibility that some axes are quieter than average. In those situations, one might need to boost the gain before it hits the VoxBox. Many stomp boxes have gain or volume controls with more than enough range to provide some seriously impressive levels.

Now a direct box is a completely different animal from a stomp box. The DI's basic function is to turn an instrument signal into a mic level signal (or a balanced line level signal). In the case of the former. A DI generally reduces the voltage (-20dB) to be appropriate for a mic pre, which means you would plug the DI into the Mic Input, and my comment wouldn't be relevant because it was pointed at the Instrument Input. Might also be weird to go thru adapters to drive a stomp box with a signal now dropped 20dB to raise it back +20 to +40 dB again.

However, one could use most direct boxes to drive the mic input and have plenty of gain in most cases. One wouldn't put a stomp box after a DI, but if you like there is nothing to stop you putting it before the DI. In fact one could "insert" the stomp box between the VoxBox Mic Pre and EQ sections though that signal may be a little hot, but workable. (or not)

And then there are some active Direct Boxes that convert an instrument signal to line level, and the appropriate place to patch these is into the VoxBox Line Input.

As to Active or Passive DI's - whatever works - whatever sounds right to you! Basically they all sound a bit different, have strengths and weaknesses and a few right ways to use them, plus many wrong ways.

The idea of the VoxBox Instrument Input was to allow most guys to not have to require a Direct Box - just plug the axe into the front panel - bingo. Several top session bass players do just that routinely. This doesn't rule out that if you prefer, you can use a direct box that you love and patch it into the Mic or Line Input, whichever is more appropriate for that box.

But the only point of all this is "Are the levels that YOU are getting hot enough, OK or too hot?" If they are OK, no problem, if too hot, turn down the gain, if not hot enough, then there are solutions maybe requiring a stomp box or DI. And only YOU can really judge "better" and that only requires listening and playing, rather than getting bogged in technicalities, patching and electronics. Have fun, make music.....

4. My meter lamps burned out. How do I get replacements? 

Older units before serial number MVB**1359 shipped before 9/2003 use: 12V 1.2W FESTOON LAMPS; Manley's Part Number: VAR016C Order these spare bulbs from www.tubesrule.com. Newest units after serial number MVB**1359 shipped after 9/2003 use yellow LED lighting and those shouldn't burn out. You can get in touch with Paul in our service department and upgrade your older unit to yellow LED lighting for $25 bucks.

5. I broke my Phantom Power switch. How do I buy another one?

Sorry we stopped stocking the locking switch and stopped using it in production as the pull-to-activate locking handle was confusing too many people and folks like you were breaking their switches. You need a simple ON-ON SPDT switch, with the long legs (Wire Wrap legs or “WW”) to reach the Printed Circuit Board. We sell these on our parts store, www.tubesrule.com. That link will take you right to the replacement switch page.

6. Help! I can’t get any output from my VOXBOX!

OK, let’s go through some basic VOXBOX signal flow troubleshooting. Pay attention to the sneaky 3-way switches!! Make sure your 0 - LINE - 180 and the INSERT‐PRE O/P - LINE switches are set to the correct positions!

Condition 1) NO OUTPUT FROM THE MIC PRE, NO METER INDICATION WHEN METER IS SET TO “PRE OUT”:

First, connect a microphone to the MIC INPUT, and connect the PREAMP OUTPUT to whatever you’re monitoring/recording with. Set the meter switch to PRE OUT; set the 0‐LINE‐180 switch to 0, set to 50db gain, and turn the input control up to at least 12 o’clock. Speaking into the mic should register on the meter and there should be output at your recording/monitoring chain. If you are not getting output here, turn the input control full CW (all the way up). If there is no sound or meter indication, you may have a bad tube. Refer to owner’s manual for tube locations. The 2 tubes on the left side of the unit are for the MIC PRE section. The 2 tubes on the right side are for the EQ section. By going out of the PREAMP OUT, we are intentionally bypassing the EQ section for this test in order to focus in on just the PREAMP section. With the unit unplugged from AC power, remove the top cover, let the tubes cool, and exchange the tubes left‐to‐right, right‐to‐left. Now repeat the test above and see if you are now getting meter indication and signal output from the PREAMP OUTPUT. If so, one of the two tubes now on the right side (EQ SECTION) is bad; you can further switch the individual tubes to find out which one it is, or just replace both.

Condition 2) MIC PRE is WORKING; NO SOUND FROM THE “EQ OUT”, NO METER INDICATION WHEN METER IS SET TO “EQ OUT”

If you are using the VOXBOX mic pre as a signal source, then first ensure that the INSERT‐PRE O/P - LINE switch is in the PRE O/P position. This internally routes the signal from the MIC PRE section to the EQ SECTION. If this is the case and the meter indicates signal in the PRE OUT position, but not in the EQ OUT position, this may indicate a bad tube in the EQ Section. Connect a line‐level signal to the INSERT input, and set the INSERT‐PRE O/P‐LINE switch to INSERT. If there is no signal or meter indication at the EQ OUT, then disconnect the AC power and exchange the tubes as outlined in step #1 above. If exchanging the tubes restores operation on the EQ section, then one of the tubes that is now in the left side of the unit is bad.

7. This thing isn’t working. I just bought it. For this amount of money, it needs to function.

OK, listen up: the XLR INPUTS and XLR OUTPUTS are TRANSFORMER-COUPLED so that means you HAVE TO have something connected to all of the pins. 

PIN 1: GROUND
PIN 2: HOT (+) POSITIVE
PIN 3: COLD (-) NEGATIVE

You cannot "float" Pin 3. You can GROUND it if you are driving it from an unbalanced source. But you cannot hook it up to "nothing".

Pay attention when interfacing with some of these interfaces like your Apollo. If you are using TRS - XLR cables, make sure that it is wired:

TRS TIP = HOT (+) to XLR Pin 2
TRS RING = COLD (-) to XLR Pin 3
TRS SLEEVE = GROUND to XLR Pin 1

or 

TS - XLR cable, make sure it is wired:
TS TIP = HOT (+) to XLR Pin 2
TS SLEEVE = GROUND to XLR Pin 1 AND Pin 3

8. No, I mean it was working and now it sounds all distorted with hardly any level. Help me!

It’s probably the 220 kOhm 3W resistor that opened up at R34 in the micpreamp’s first tube’s anode on Pin 6 of the 12AX7. If you can solder, it is easy to replace, but when replacing it, don’t allow the resistor legs to bend so close to the body. This issue has been corrected in later PCB layouts. Replacing the resistor is an easy thing to fix if you, or somebody you know, can solder and replace this part. Or we can fix it for you of course. But if you can fix it locally without having to ship it to California, that's always best. Head on over to the Tech Support section of our website for additional help or to request an RA# for us to fix it for you if that’s what you choose.

X

Vraag de offerte aan door op bekijk aanvraag te klikken of voeg meer producten toe aan uw aanvraag en klik op 'doorwinkelen'.

Bekijk offerteDoorwinkelen

Het product is toegevoegd aan uw korte verhuur aanvraag. Dit is uw prijs voor 1 week huur of de reeds gekozen periode. Wijzig de huurperiode door op 'bekijk aanvraag' te klikken. Of voeg meer producten toe aan uw aanvraag en klik op 'doorwinkelen'.

Bekijk aanvraagDoorwinkelen

Het product is toegevoegd aan jouw jaarhuur aanvraag. Wijzig de aanvangsdatum door op 'bekijk aanvraag' te klikken of voeg meer producten toe en klik op 'doorwinkelen'

Bekijk aanvraagDoorwinkelen